👀 Intro
상황
- React로 웹개발하고 Webview로 띄우는 방식인 하이브리드 앱 방식으로 진행했습니다.
- 하이브리드 앱 장점
- 장점: 웹으로 개발하기 때문에 유지보수가 쉽고 IOS 와 안드로이드를 동시에 개발할 수 있다.
- 단점: Webview로 띄우는 방식이기 때문에, 네이티브 방식 보다 느리고 밑의 그림같은 앱 내 효과를 사용하기 어렵다.
- 하이브리드 사용한 이유
- 네이티브 보다 느리지만, 이커머스 서비스는 다른 앱 서비스에 비해 상대적으로 사용자 경험을 많이 요구하지 않음
- 벤치마킹: 무신사, 온더룩, 캐치테이블 등 이미 많은 기업들이 하이브리드 앱 방식으로 개발을 진행
 |
요구사항
해결 방안많은 자료 조사 밑 고민 끝에 react-navigation 및 onMessage를 사용하고, 웹에서 Stack Navigation 과 관련 있는 페이지로 이동 시, postMessage를 사용하여 앱에 신호를 보내는 방식으로 구현했습니다. |
문제 접근
- React Native 와 React 간의 브릿지 통신을 통해 Stack Navigation를 구현했습니다.
React Native 브릿지 통신


- 리액트 네이티브는 네이티브 프레임워크와 자바스크립트 엔진 간의 통신을 하게 되는 데, 이러한 방식을 브릿지 방식이라고 합니다.
- 브릿지 방식은 웹 브라우저에서 사용되는 자바스크립트의 엔진의 핵심 부분을 이용하여, 자바스크립트로 작성된 컴포넌트가 네이티브 환경이 뷰 클래스를 호출할 수 있도록 연결합니다.
- 리액트 네이티브는 이런한 방식을 채택하기 때문에, WebView의 리액트와 리액트 네이티브간의 브릿지 통신이 가능합니다.
React Native 웹뷰 통신
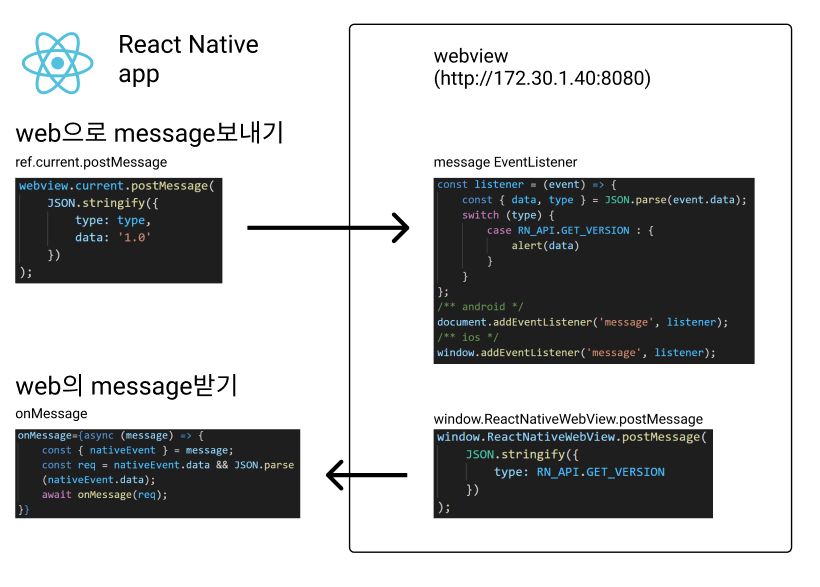
socket 단위로 통신을 하기 때문에, 각 메시지를 보낼때, JSON을 문자열 형식으로 변환해서 보내야 합니다.
React-Native
|
React (Webview)
|
코드 구현 및 동작 과정
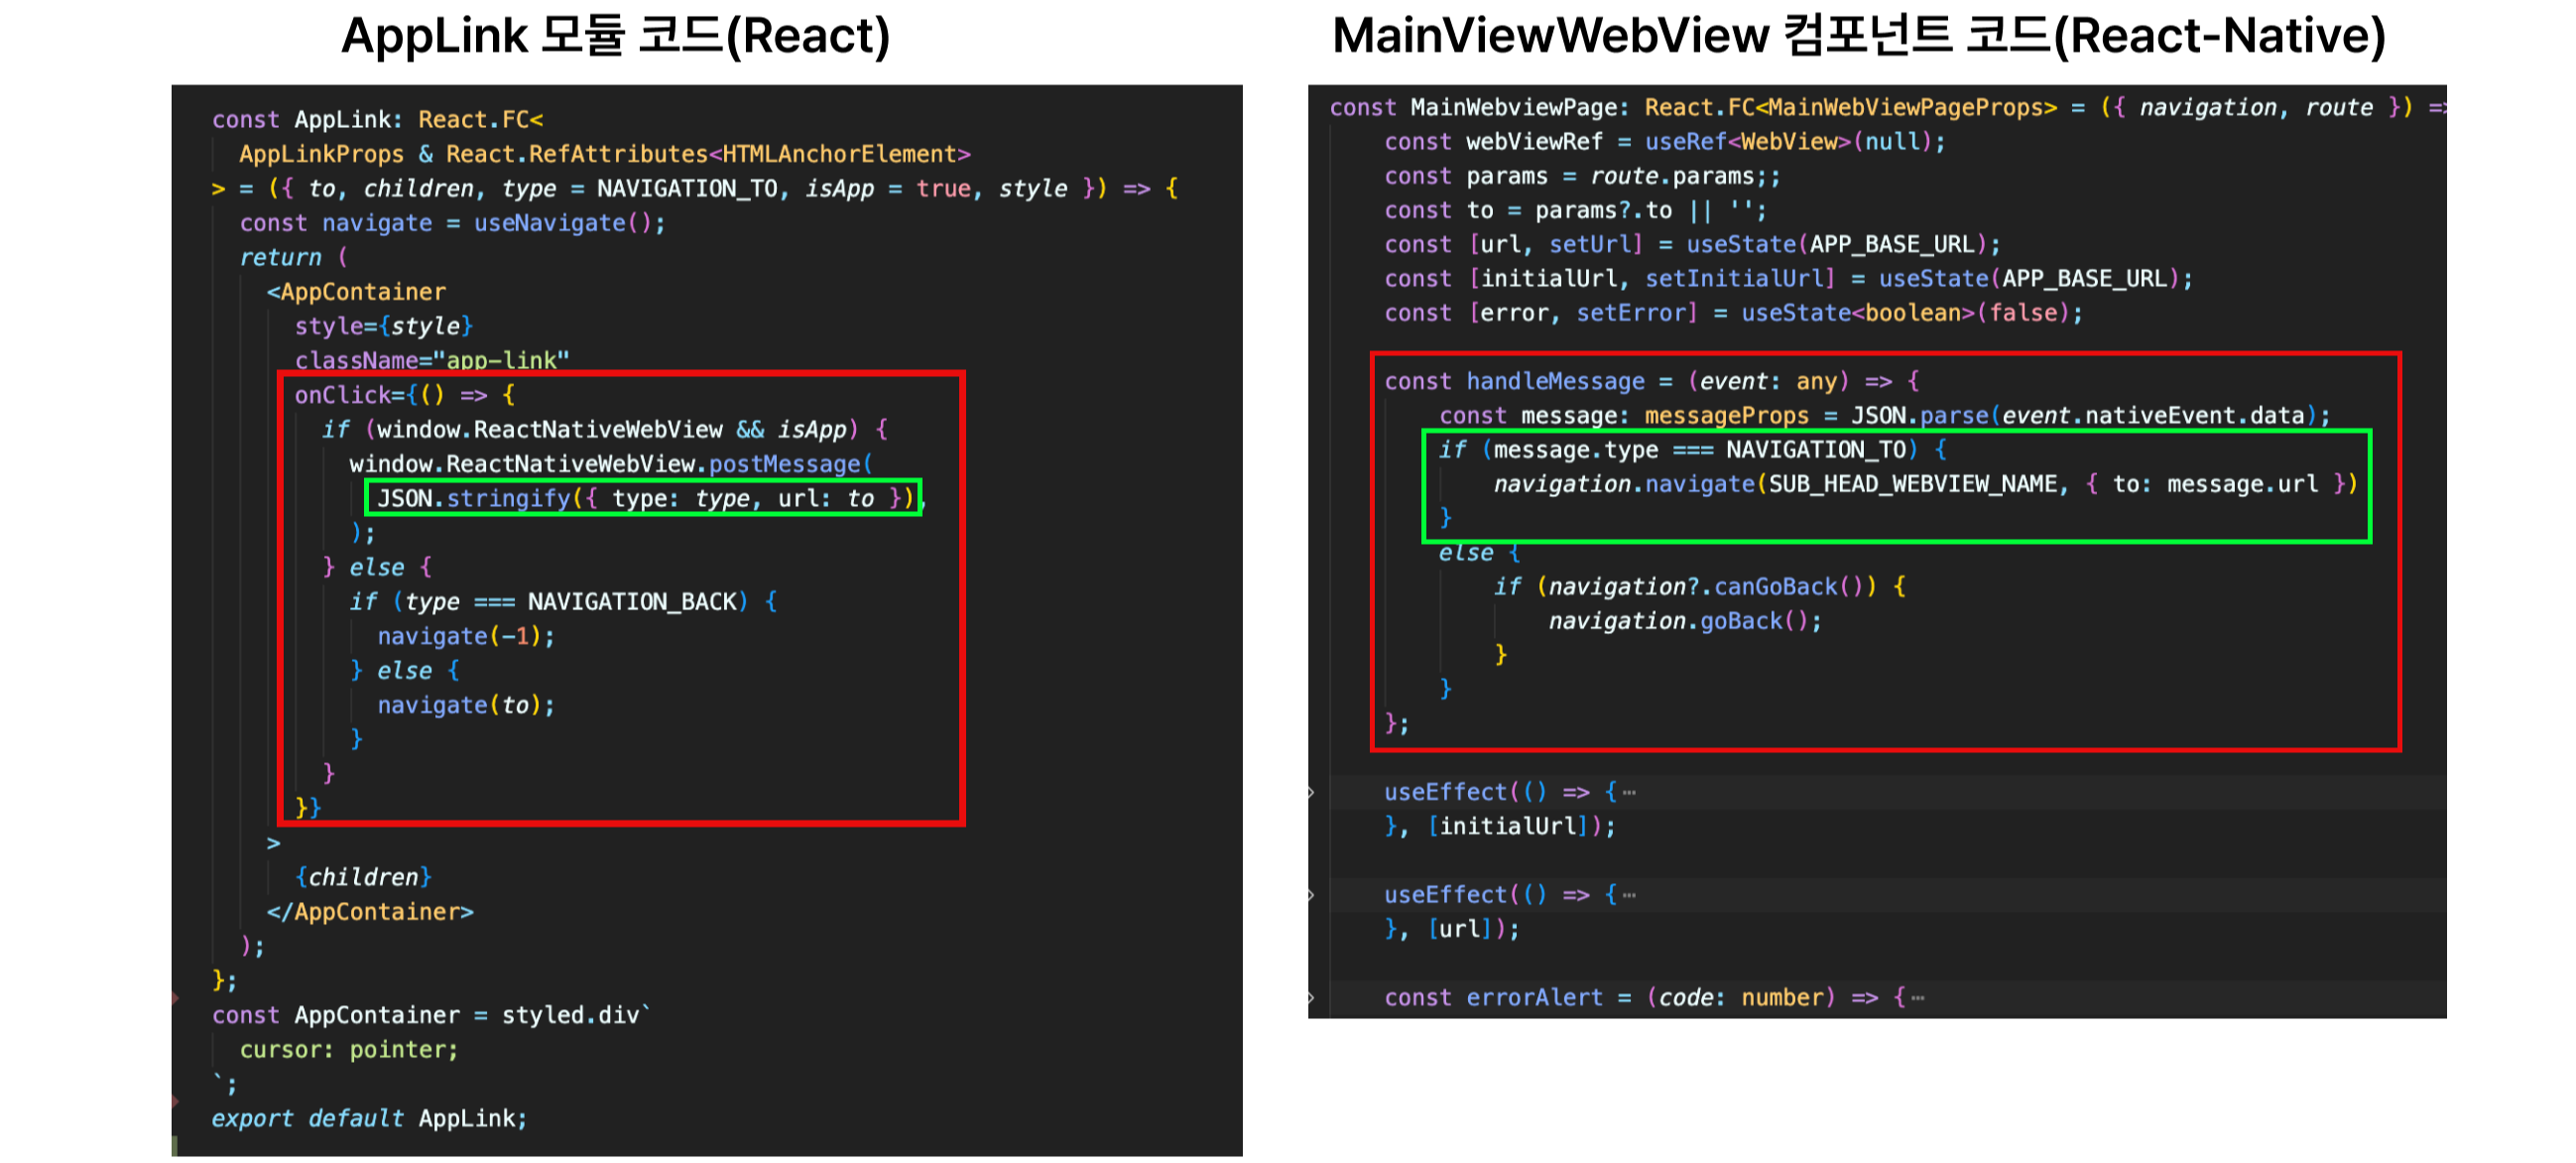
- AppLink 모듈은 React의 내장 모듈인 Link 모듈과 비슷한 기능 및 React-Native로 브릿지 통신을 보내는 기능을 포함한 모듈입니다.
- MainViewWebView는 첫 앱 실행시, 보여주는 웹뷰 입니다. 해당 컴포넌트 안에는 브릿지 통신 기능 뿐만아니라, 웹뷰를 실행 시키기 위한 초기 설정 값들도 포함하고 있습니다.
동작 과정
- AppLink를 둘러 싼 컴포넌트를 누를 시(이떄 isApp 속성이 true 인 경우), 리액트 네이티브로 type값 과 url 정보를 보냅니다.
- React-Native의 MainViewWebView는 React가 보낸 통신 값을 확인하고 이떄 type의 값이 NAVIGATION_TO(=”navigationTo”)인 경우 Stack Navigation에 새로운 웹 뷰(SUB_HEAD_WEBVIEW_NAME: subHeadWebViewPage)를 넣어주고 동시에 보내 준 url로 이동시켜 새로운 웹뷰가 보여주도록 합니다.
- NAVIGATION_BACK(=”navigationTo”)인 경우 Stack-Navigation에서 해당 웹뷰를 제거해, 이전 웹뷰로 이동합니다.
전체 코드
AppLink.tsx
import React, { ReactNode } from 'react';
import { useNavigate } from 'react-router-dom';
import styled from 'styled-components';
import { NAVIGATION_BACK, NAVIGATION_TO } from '../const/AppVars';

declare global {
  interface Window {
    ReactNativeWebView: {
      postMessage: (message: string) => void;
    };
  }
}

interface AppLinkProps {
  children: ReactNode;
  to: string;
  type?: string;
  isApp?: boolean;
  style?: React.CSSProperties;
}

const AppLink: React.FC<
  AppLinkProps & React.RefAttributes<HTMLAnchorElement>
> = ({ to, children, type = NAVIGATION_TO, isApp = true, style }) => {
  const navigate = useNavigate();
  return (
    <AppContainer
      style={style}
      className="app-link"
      onClick={() => {
        if (window.ReactNativeWebView && isApp) {
          window.ReactNativeWebView.postMessage(
            JSON.stringify({ type: type, url: to }),
          );
        } else {
          if (type === NAVIGATION_BACK) {
            navigate(-1);
          } else {
            navigate(to);
          }
        }
      }}
    >
      {children}
    </AppContainer>
  );
};

const AppContainer = styled.div`
  cursor: pointer;
`;

export default AppLink;
MainViewWebView.tsx
import React, { useEffect, useRef, useState } from 'react';
import { StyleSheet, Dimensions, Linking, Alert } from 'react-native';
import WebView from 'react-native-webview';
import { APP_BASE_URL } from "@env";
import { StackNavigationProp } from '@react-navigation/stack';
import { MAIN_WEBVIEW_NAME, NAVIGATION_TO, SUB_HEAD_WEBVIEW_NAME } from '../constants/WebViewVar';
import CookieManager from '@react-native-cookies/cookies';
import AsyncStorage from '@react-native-async-storage/async-storage';
import { COOKIES, CookieProps, REFRESH_TOKEN } from '../constants/CookieVar';
import { RouteProp } from '@react-navigation/native';

const windowWidth = Dimensions.get('window').width;
const windowHeight = Dimensions.get('window').height;

type MainWebViewPageProps = {
    navigation: StackNavigationProp<any, typeof MAIN_WEBVIEW_NAME>;
    route: RouteProp<any, typeof MAIN_WEBVIEW_NAME>;
};

interface messageProps {
    type: string;
    url: string;
}

const MainWebviewPage: React.FC<MainWebViewPageProps> = ({ navigation, route }) => {
    const webViewRef = useRef<WebView>(null);
    const params = route.params;;
    const to = params?.to || '';
    const [url, setUrl] = useState(APP_BASE_URL);
    const [initialUrl, setInitialUrl] = useState(APP_BASE_URL);
    const [error, setError] = useState<boolean>(false);

    const handleMessage = (event: any) => {
        const message: messageProps = JSON.parse(event.nativeEvent.data);
        if (message.type === NAVIGATION_TO) {
            navigation.navigate(SUB_HEAD_WEBVIEW_NAME, { to: message.url })
        }
        else {
            if (navigation?.canGoBack()) {
                navigation.goBack();
            }
        }
    };

    useEffect(() => {
        AsyncStorage.getItem(COOKIES).then(storageCookiesString => {
            if (storageCookiesString === null) return;
            const storageCookies: { [key: string]: CookieProps } = JSON.parse(storageCookiesString);

            const cookiesKey = Object.keys(storageCookies);
            if (cookiesKey.includes(REFRESH_TOKEN)) {
                const cookie: { [key: string]: CookieProps } = {}
                const refreshTokenCookie: CookieProps = storageCookies[REFRESH_TOKEN];
                cookie[REFRESH_TOKEN] = refreshTokenCookie
                const refreshToken = JSON.stringify(cookie);
                // AsyncStorage.setItem(COOKIES, refreshToken);
                CookieManager.set(APP_BASE_URL, refreshTokenCookie);
            }
        })

    }, [initialUrl]);

    useEffect(() => {
        CookieManager.getAll(true)
            .then(cookies => {
                AsyncStorage.setItem(COOKIES, JSON.stringify(cookies));
            });
    }, [url]);

    const errorAlert = (code: number) => {
        let msg = '';
        if (code === -1009) msg = "인터넷에 연결되어 있지 않습니다. 네트워크 연결을 확인해주세요.";
        else msg = "네트워크에 오류가 발생하여 앱에 연결할 수 없습니다.";

        Alert.alert(
            "BUCL",
            msg,                         // 두번째 text: 그 밑에 작은 제목
            [
                {
                    text: "재시도",                              // 버튼 제목
                    onPress: () => {
                        setError(false)
                        webViewRef.current?.reload();
                    },
                    style: "cancel"
                }
            ],
            { cancelable: false }
        );
    }

    return <>
        {!error && <WebView
            ref={webViewRef}
            source={{ uri: APP_BASE_URL + to }}
            scalesPageToFit={false}
            style={styles.webview}
            onMessage={handleMessage}
            onError={(event) => {
                setError(true);
                errorAlert(event.nativeEvent.code);
            }}
            onLoadStart={(syntheticEvent) => {
                const { nativeEvent } = syntheticEvent;
                setInitialUrl(nativeEvent.url);

            }}
        />}

    </>
};

export default MainWebviewPage;

const styles = StyleSheet.create({
    webview: {
        flex: 1,
        width: windowWidth,
        height: windowHeight,
    },
});
참고
- 웹뷰를 이용해 웹 서비스를 앱으로 빠르게 구현하기 | 인프콘2023
- 벤치마킹: 온더룩(패션 커머스) React 와 RN 간 브릿지 통신을 통한 Webview에 Stack Navigation 구현
'프론트엔드' 카테고리의 다른 글
| 점메추 룰렛 내 근처 (4) | 2025.05.08 |
|---|