Keras_1.Modeling
- Keras 모델링은 크게 순차적 API, 기능적 API, 모델 서브클래싱 방식으로 나뉜다.
from tensorflow.keras.datasets import mnist
import tensorflow as tf
from tensorflow import keras
from tensorflow.keras import layers
import matplotlib.pyplot as plt
import numpy as np
# 원본 데이터 불러오기
(x_train, y_train), (x_test, y_test) = mnist.load_data("./mnist.npz")
# 데이터 샘플링
x_train, x_test = x_train/ 255.0, x_test/255.0
y_train, y_test = tf.one_hot(y_train,10), tf.one_hot(y_test,10)
The Sequential API(순차적 API)
- 순차 모델은 각 레이어가 정확히 하나의 입력 텐서와 하나의 출력 텐서를 갖는 레이어의 단순한 스택에 적합하다.
- 순차 모델은 다음과 같을 때 적합하지 않다.
- 모형에 입력 또는 출력이 여러 개 있을 때,
- 레이어에 여러 개의 입력 또는 출력이 있을 때,
- 레이어 공유를 수행할 때,
- 비선형 위상(예: 잔차 연결, 다중 분기 모형)을 사용할때
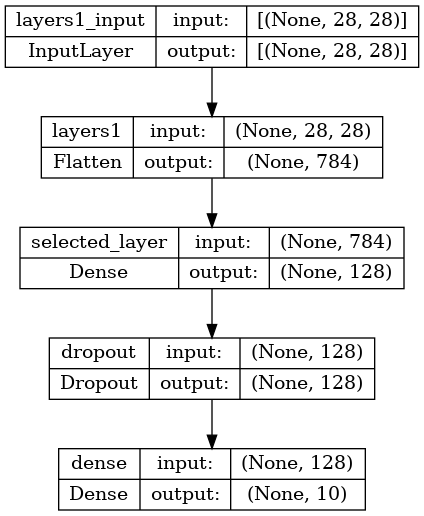
순차 모델 생성1
model = keras.models.Sequential([
    keras.layers.Flatten(input_shape=(28, 28),name="layers1"),
    keras.layers.Dense(128, activation='relu',name="selected_layer"),
    keras.layers.Dropout(0.2,name="layers3"),
    keras.layers.Dense(10,name="layers4")
])
순차 모델 생성2
model = keras.models.Sequential()
model.add(keras.layers.Flatten(input_shape=(28, 28),name="layers1"))
model.add(keras.layers.Dense(128, activation='relu',name="selected_layer"))
model.add(keras.layers.Dropout(0.2))
model.add(keras.layers.Dense(10))
model 요약 보기
model.summary()
Model: "sequential_1"
_________________________________________________________________
 Layer (type)                Output Shape              Param #
=================================================================
 layers1 (Flatten)           (None, 784)               0

 selected_layer (Dense)      (None, 128)               100480

 dropout (Dropout)           (None, 128)               0

 dense (Dense)               (None, 10)                1290

=================================================================
Total params: 101,770
Trainable params: 101,770
Non-trainable params: 0
_________________________________________________________________
모델 이미지화 시키기
keras.utils.plot_model(model,"./images/model.png",show_shapes=True)
layer 이름 넣어 주기
- layer에 이름을 넣어주면 Layer 구분을 뿐만 아니라TensorflowBoard 그래프에서 보다 쉽게 분석하기 좋아진다.
keras.layers.Flatten(input_shape=(28, 28),name="layers1")
<keras.layers.reshaping.flatten.Flatten at 0x7f9601a8d2e0>모델 레이어 확인
print(model.layers)
[<keras.layers.reshaping.flatten.Flatten object at 0x7f95fe7269a0>, <keras.layers.core.dense.Dense object at 0x7f9601a8dfd0>, <keras.layers.regularization.dropout.Dropout object at 0x7f96c0219f40>, <keras.layers.core.dense.Dense object at 0x7f95fe7269d0>]
모델 레이어 타입 확인
model.layers[0].dtype
'float32'모델 레이어 이름 확인
model.layers[0].name
'layers1'모델 이름으로 특정 레이어 가져오기
model.get_layer(name="selected_layer")
<keras.layers.core.dense.Dense at 0x7f9601a8dfd0>모델 레이어의 입력,출력 레이어 가져오기
- 모델의 각 레이어는 입력 레이어와 출력 레이어를 가지고 있다.
- 입력, 출렉 레이어 객체는 KerasTensor 이다.
input = keras.layers.Input(shape=(28,28))

# 반환값은 출렉 레이어,
# 입력 레이어도 있지만 현재 상태에서 참조 못함
x = keras.layers.Dense(64,activation="relu",name="layer")(input)
print(x)
KerasTensor(type_spec=TensorSpec(shape=(None, 28, 64), dtype=tf.float32, name=None), name='layer/Relu:0', description="created by layer 'layer'")
model.layers[0].input
<KerasTensor: shape=(None, 28, 28) dtype=float32 (created by layer 'layers1_input')>model.layers[0].output
<KerasTensor: shape=(None, 784) dtype=float32 (created by layer 'layers1')>모델 레이어 형태 가져오기
model.layers[1].input.shape
TensorShape([None, 784])모델 레이어의 Freezing(훈련 x) 시키기
# 각 layer 훈련 가능 한지 확인
for model_layer in model.layers:
    print(model_layer.trainable)
True
True
True
True
# 특정 레이어 Feezing(훈련 x) 하기
model.layers[0].trainable = False
# 모든 레이어 동결(훈련 x)시키기
model.trainable = False
model.summary()
Model: "sequential_1"
_________________________________________________________________
 Layer (type)                Output Shape              Param #
=================================================================
 layers1 (Flatten)           (None, 784)               0

 selected_layer (Dense)      (None, 128)               100480

 dropout (Dropout)           (None, 128)               0

 dense (Dense)               (None, 10)                1290

=================================================================
Total params: 101,770
Trainable params: 0
Non-trainable params: 101,770
_________________________________________________________________
model.trainable = True
모델 레이어 weight 값 가져오기
model.layers[1].weights
[<tf.Variable 'selected_layer/kernel:0' shape=(784, 128) dtype=float32, numpy=
 array([[-0.01164588, -0.00682949,  0.00830153, ..., -0.06701458,
          0.02769894,  0.01378055],
        [-0.05714229,  0.00922921,  0.04963658, ...,  0.054552  ,
          0.02670706, -0.07862671],
        [ 0.04893874, -0.0176772 ,  0.0355798 , ...,  0.07736995,
          0.05347396, -0.02288734],
        ...,
        [-0.02690422,  0.07777014, -0.05833617, ...,  0.00757238,
         -0.05062428, -0.06653195],
        [ 0.06312343,  0.07876339,  0.01411176, ...,  0.00786939,
          0.06733128, -0.00647818],
        [-0.00450617,  0.05777147, -0.05207102, ..., -0.04291544,
          0.07488076,  0.00742538]], dtype=float32)>,
 <tf.Variable 'selected_layer/bias:0' shape=(128,) dtype=float32, numpy=
 array([0., 0., 0., 0., 0., 0., 0., 0., 0., 0., 0., 0., 0., 0., 0., 0., 0.,
        0., 0., 0., 0., 0., 0., 0., 0., 0., 0., 0., 0., 0., 0., 0., 0., 0.,
        0., 0., 0., 0., 0., 0., 0., 0., 0., 0., 0., 0., 0., 0., 0., 0., 0.,
        0., 0., 0., 0., 0., 0., 0., 0., 0., 0., 0., 0., 0., 0., 0., 0., 0.,
        0., 0., 0., 0., 0., 0., 0., 0., 0., 0., 0., 0., 0., 0., 0., 0., 0.,
        0., 0., 0., 0., 0., 0., 0., 0., 0., 0., 0., 0., 0., 0., 0., 0., 0.,
        0., 0., 0., 0., 0., 0., 0., 0., 0., 0., 0., 0., 0., 0., 0., 0., 0.,
0., 0., 0., 0., 0., 0., 0., 0., 0.], dtype=float32)>]y_train
<tf.Tensor: shape=(60000, 10), dtype=float32, numpy=
array([[0., 0., 0., ..., 0., 0., 0.],
       [1., 0., 0., ..., 0., 0., 0.],
       [0., 0., 0., ..., 0., 0., 0.],
       ...,
       [0., 0., 0., ..., 0., 0., 0.],
       [0., 0., 0., ..., 0., 0., 0.],
       [0., 0., 0., ..., 0., 1., 0.]], dtype=float32)>
Training, evaluation, and inference
- Training(학습), Evalutation(평가), Inference(추론)은 functional API 와 Sequential 모델과 정확히 동일하게 같은 방식으로 작동한다.
- model 클래스 컴파일을 "compile()"을 통해 설정할 수 있다.
- Model 클래스는 학습 루프인 "fit()" 와 평가 루프인 "evaluate()"를 제공한다.
- 또한 이러한 루프 를 쉽게 사용자 정의하여 지도 학습 이상의 훈련 루틴(예: GAN )을 구현할 수 있다.
optimizer = keras.optimizers.Adam()
loss = keras.losses.CategoricalCrossentropy(from_logits=True)
logits
- 최종 Sigmoid나 Softmax를 지나기 전 단계, 즉 Model의 Raw Output을 의미한다.
from_logits의 의미는 모델이 출력하는 output이 logit인지 아닌지를 판단하는 것
model.compile(
    optimizer = optimizer,
    loss = loss,
    metrics=['accuracy']
)
history = model.fit(x_train,y_train,batch_size=32,epochs=3,validation_split=0.2)
Epoch 1/3
1500/1500 [==============================] - 2s 1ms/step - loss: 0.1189 - accuracy: 0.9637 - val_loss: 0.1028 - val_accuracy: 0.9708
Epoch 2/3
1500/1500 [==============================] - 2s 1ms/step - loss: 0.0803 - accuracy: 0.9746 - val_loss: 0.0875 - val_accuracy: 0.9762
Epoch 3/3
1500/1500 [==============================] - 2s 1ms/step - loss: 0.0695 - accuracy: 0.9779 - val_loss: 0.0845 - val_accuracy: 0.9733
model.evaluate(x_test,y_test)
313/313 [==============================] - 0s 718us/step - loss: 0.0750 - accuracy: 0.9762
[0.07502560317516327, 0.9761999845504761]Save and serialize
Sequential 모델 == Functional API
모델 저장시 저장 되는 내용
- 모델 구조
- 모델 weight 값들
- 모델 훈련 config(설정)
- optimizer와 optimizer 상태
- parameter만 저장하고 불러오기
- 모델 형태가 존재해야됨
- 주로 실시간 훈련 중 데이터가 날라가기 전에 백업 용으로 많이 쓴다.
model.save_weights("./data/models/model_parameter/model.tf")
model.load_weights("./data/models/model_parameter/model.tf")
<tensorflow.python.training.tracking.util.CheckpointLoadStatus at 0x282339b4430>- Model 전체 저장하고 불러오기
model.save("./data/models/path_to_my_model")
del model
model = keras.models.load_model("./data/models/path_to_my_model")
INFO:tensorflow:Assets written to: ./data/models/path_to_my_model\assets
활용: 마지막 레이어 빼고 나머지 훈련 x 시키기
- 해당 활용은 기존에 학습된 모델을 다른 데이터에 적용할 때 쓰는 방식으로 모든 레이어를 학습 시키는 것이 아닌 일부 레이어만 학습 하도록 하면 성능이 좋게 나온다.
model = keras.Sequential([
    keras.Input(shape=(784)),
    layers.Dense(32, activation='relu'),
    layers.Dense(32, activation='relu'),
    layers.Dense(32, activation='relu'),
    layers.Dense(10),
])

# Presumably you would want to first load pre-trained weights.
model.load_weights(...)

# Freeze all layers except the last one.
for layer in model.layers[:-1]:
    layer.trainable = False

# Recompile and train (this will only update the weights of the last layer).
model.compile(...)
model.fit(...)
활용: 대표모델과 사용자 레이어 합치기
- 해당 활용은 위에 처럼 기존에 학습된 모델을 다른 데이터에 적용할 때 쓰는 방식으로 대표 모델을 사용하기 때문에 성능이 아주 좋다. 주로, Object-Detection, GAN, 등 고급 모델에 사용할 때 쓰인다.
- 합칠때 스택 처럼 쌓아야 되기 때문에, Sequential를 사용한다.
# Load a convolutional base with pre-trained weights
base_model = keras.applications.Xception(
    weights='imagenet',
    include_top=False,
    pooling='avg')

# Freeze the base model
base_model.trainable = False

# Use a Sequential model to add a trainable classifier on top
model = keras.Sequential([
    base_model,
    layers.Dense(1000),
])

# Compile & train
model.compile(...)
model.fit(...)
The Functional API(기능적 API)
- Functional API는 tf.keras.Sequential API보다 더 유연한 모델을 만드는 방법이다.
- 비선형 토폴로지, 공유 레이어, 여러 입력 또는 출력을 포함하는 모델을 다루기 쉽다.
keras에서 shape 설정시 해당 데이터의 sample를 뺀 shape를 순서대로 적어주고, sample 개수는 ,로 넣어 주지 않는다. ex) 60000x1x28x28 데이터셋 -> shape=(1,28,28,)
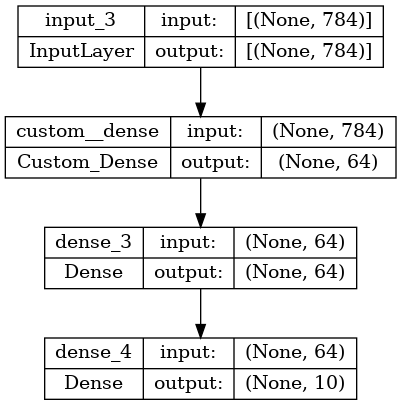
inputs = keras.Input(shape=(784,)) # 데이터의 모양은 784차원 벡터로 설정
layer 호출은 inputs를 해당 layer의 방향으로 순전파 하는 행동이다.
class Custom_Dense(keras.layers.Dense):
    def __init__(self, units, activation, *args, **kwargs):
        return super().__init__(units, activation=activation)
dense = Custom_Dense(64, activation="relu")
x = dense(inputs)
다음과 같이 레이어 그래프에 레이어를 몇 개 더 추가할 수 있다.
x = layers.Dense(64, activation="relu")(x)
outputs = layers.Dense(10)(x)
Model api을 사용해 inputs과 inputs으로 시작한 outputs레이어 설정한 Model를 만든다.
model = keras.Model(inputs, outputs=outputs, name="the_model")
모델 이미지화 시키기
keras.utils.plot_model(model,"./images/model.png",show_shapes=True)
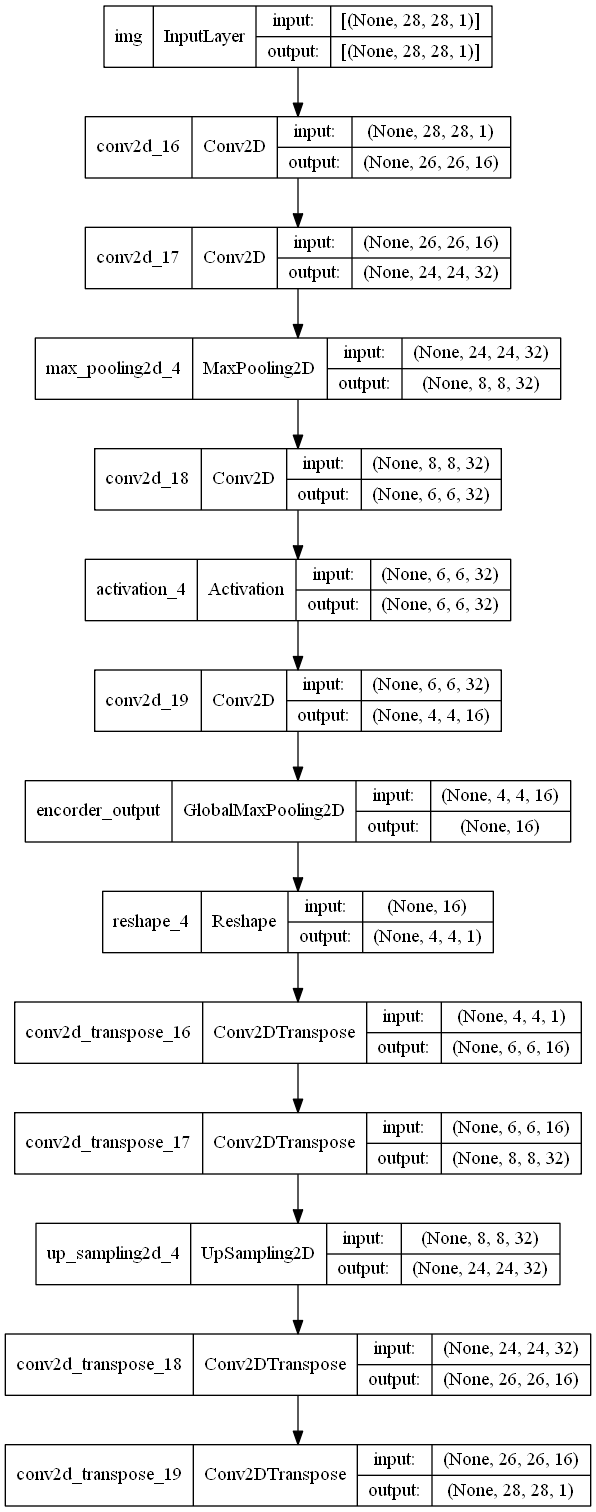
Use the same graph of layers to define multiple models
- Functional API에서, 모델들은
- 여러 모델을 생성할 때, 레이어의 단일 그래프를 연결 지으며 사용할 수 있다.
- 밑의 코드에서 encoder 그래프가 autoencoder그래프를 또 거친다.
encoder_input = layers.Input(shape=(28,28,1,), name="img")
x = layers.Conv2D(16,3,activation="relu")(encoder_input)
x = layers.Conv2D(32,3,activation="relu")(x)
x = layers.MaxPooling2D(pool_size=3)(x)
x = layers.Conv2D(32,3)(x)
x = layers.Activation("relu")(x)
x = layers.Conv2D(16,3,activation="relu")(x)
encoder_output = layers.GlobalMaxPool2D(name="encorder_output")(x)

encoder = keras.Model(encoder_input,encoder_output, name="encoder")

x = layers.Reshape((4, 4, 1))(encoder_output)
x = layers.Conv2DTranspose(16, 3, activation="relu")(x)
x = layers.Conv2DTranspose(32, 3, activation="relu")(x)
x = layers.UpSampling2D(3)(x)
x = layers.Conv2DTranspose(16, 3, activation="relu")(x)
decoder_output = layers.Conv2DTranspose(1, 3, activation="relu")(x)

autoencoder = keras.Model(encoder_input, decoder_output, name="autoencoder")
Transpose_Convolution
Transpose_Convolution:참조/Convolution에서%20파생된%20여러%20Layer%20모음.ipynb)
Up_Sampling 이해하기
Up_Sampling:참조/Pooling에서%20파생된%20여러%20Layer%20모음.ipynb#up_sampling-이해하기)]
keras.utils.plot_model(autoencoder,"./images/model.png",show_shapes=True)
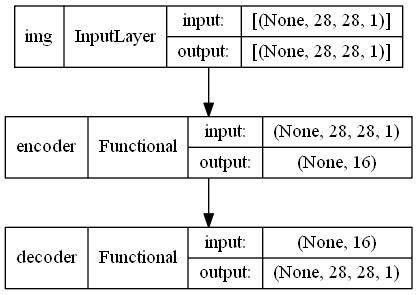
All models are callable, just like layers
- 모든 모델은 layer와 마찬가지로 어디에서 호출가능하다.(즉 모델을 layer와 같은 것으로 생각하면 된다.)
- 모델을 호출하면 모델의 아키텍처를 재사용할 뿐만 아니라 가중치도 재사용 한다.
encoder_input = keras.Input(shape=(28, 28, 1), name="original_img")
x = layers.Conv2D(16, 3, activation="relu")(encoder_input)
x = layers.Conv2D(32, 3, activation="relu")(x)
x = layers.MaxPooling2D(3)(x)
x = layers.Conv2D(32, 3, activation="relu")(x)
x = layers.Conv2D(16, 3, activation="relu")(x)
encoder_output = layers.GlobalMaxPooling2D(name="encorder_output")(x)

encoder = keras.Model(encoder_input, encoder_output, name="encoder")
encoder.summary()

decoder_input = keras.Input(shape=(16,), name="encoded_img")
x = layers.Reshape((4, 4, 1))(decoder_input)
x = layers.Conv2DTranspose(16, 3, activation="relu")(x)
x = layers.Conv2DTranspose(32, 3, activation="relu")(x)
x = layers.UpSampling2D(3)(x)
x = layers.Conv2DTranspose(16, 3, activation="relu")(x)
decoder_output = layers.Conv2DTranspose(1, 3, activation="relu",name="decorder_output")(x)

decoder = keras.Model(decoder_input, decoder_output, name="decoder")
decoder.summary()

autoencoder_input = keras.Input(shape=(28, 28, 1), name="img")
encoded_img = encoder(autoencoder_input)
decoded_img = decoder(encoded_img)
autoencoder = keras.Model(autoencoder_input, decoded_img, name="autoencoder")
Model: "encoder"
_________________________________________________________________
 Layer (type)                Output Shape              Param #
=================================================================
 original_img (InputLayer)   [(None, 28, 28, 1)]       0

 conv2d_44 (Conv2D)          (None, 26, 26, 16)        160

 conv2d_45 (Conv2D)          (None, 24, 24, 32)        4640

 max_pooling2d_11 (MaxPoolin  (None, 8, 8, 32)         0
 g2D)

 conv2d_46 (Conv2D)          (None, 6, 6, 32)          9248

 conv2d_47 (Conv2D)          (None, 4, 4, 16)          4624

 encorder_output (GlobalMaxP  (None, 16)               0
 ooling2D)

=================================================================
Total params: 18,672
Trainable params: 18,672
Non-trainable params: 0
_________________________________________________________________
Model: "decoder"
_________________________________________________________________
 Layer (type)                Output Shape              Param #
=================================================================
 encoded_img (InputLayer)    [(None, 16)]              0

 reshape_11 (Reshape)        (None, 4, 4, 1)           0

 conv2d_transpose_43 (Conv2D  (None, 6, 6, 16)         160
 Transpose)

 conv2d_transpose_44 (Conv2D  (None, 8, 8, 32)         4640
 Transpose)

 up_sampling2d_16 (UpSamplin  (None, 24, 24, 32)       0
 g2D)

 conv2d_transpose_45 (Conv2D  (None, 26, 26, 16)       4624
 Transpose)

 decorder_output (Conv2DTran  (None, 28, 28, 1)        145
 spose)

=================================================================
Total params: 9,569
Trainable params: 9,569
Non-trainable params: 0
_________________________________________________________________
keras.utils.plot_model(autoencoder,show_shapes=True)
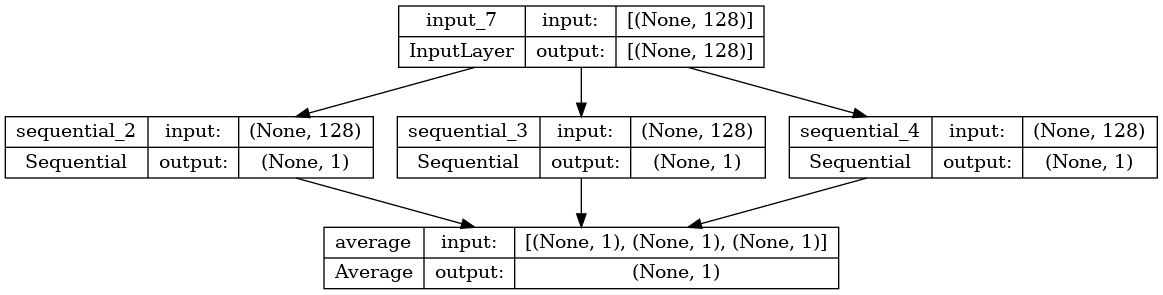
뿐만아니라 모델은 중첩가능하다. 즉 모델은 서브 모델을 포함할 수 있다(since a model is just like a layer).
중첩 모델의 예로 앙상블 모델이 있다.
def get_model():
    model = keras.models.Sequential()
    model.add(layers.Input(shape=(128,)))
    model.add(layers.Dense(1))
    return model


model1 = get_model()
model2 = get_model()
model3 = get_model()

input_layer = layers.Input(shape=(128,))
output_layer = layers.average([model1(input_layer),model2(input_layer),model3(input_layer)])

ensemble_model = keras.Model(input_layer,output_layer)
keras.utils.plot_model(ensemble_model,show_shapes=True)
복잡한 그래프 토폴로지 조작
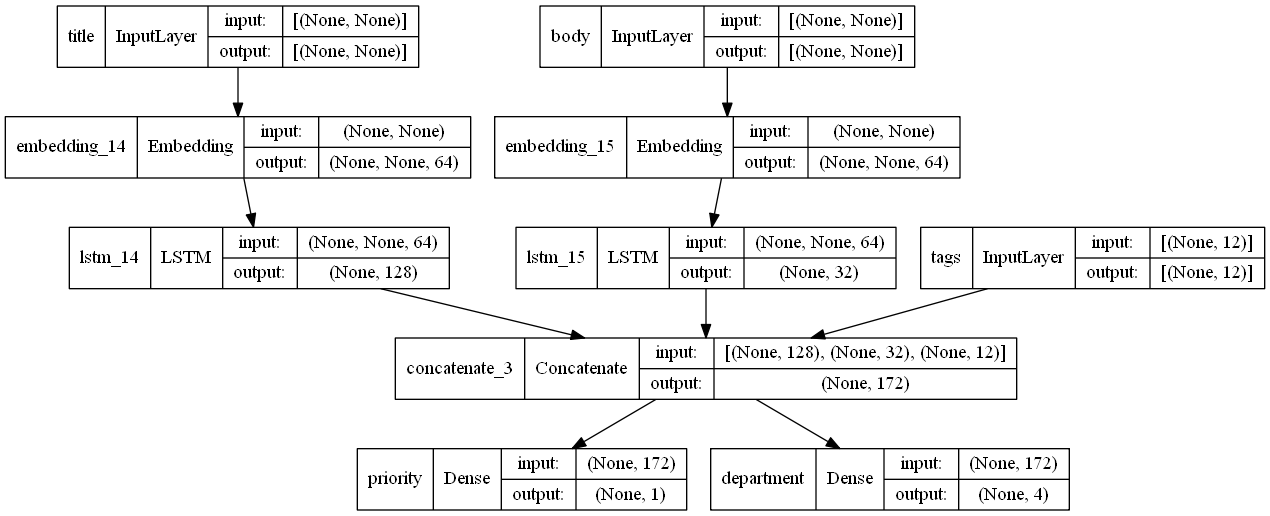
다중 입력 및 출력이 있는 모델
Functional API를 사용하면 여러 입력 및 출력을 쉽게 조작 가능(Sequential API에서는 처리하기 어려움)
예시 코드)
- 입력
- 티켓 제목(텍스트 입력),
- 티켓의 텍스트 본문(텍스트 입력) 및
- 사용자가 추가한 태그(범주 입력)
- 출력
- 0과 1 사이의 우선 순위 점수 (스칼라 시그모이드 출력) 및
- 티켓을 처리해야 하는 부서(부서 집합에 대한 소프트맥스 출력).
num_tags = 12
num_words = 10000
num_departments = 4

title_input = layers.Input(shape=(None,),name="title")
body_input = layers.Input(shape=(None,),name="body")
tags_input = layers.Input(shape=(num_tags,),name="tags")

title_features = layers.Embedding(num_words,64)(title_input)
body_features = layers.Embedding(num_words,64)(body_input)

title_features = layers.LSTM(128)(title_features)
body_features = layers.LSTM(32)(body_features)

concatente = layers.concatenate(
    [title_features,body_features,tags_input],
)

priority_pred = layers.Dense(1,name="priority")(concatente)
department_pred = layers.Dense(4,name="department")(concatente)

multi_model = keras.Model(
    [title_input,body_input,tags_input],
    [priority_pred,department_pred]
)
keras.utils.plot_model(multi_model,show_shapes=True)
다중 출력 모델을 컴파일할 때 각 출력에 다른 손실을 할당할 수 있다.
각 손실에 다른 가중치를 할당하여 총 훈련 손실에 대한 기여를 조절할 수도 있다.
model.compile(
    optimizer=keras.optimizers.RMSprop(1e-3),
    loss={
        "priority": keras.losses.BinaryCrossentropy(from_logits=True),
        "department": keras.losses.CategoricalCrossentropy(from_logits=True),
    },
    loss_weights={"priority": 1.0, "department": 0.2},
)
출력 레이어 이름으로 손실 및 손실 가중치를 지정할 수도 있다.
multi_model.compile(
    optimizer = keras.optimizers.RMSprop(1e-3),
    loss={
        'priority':keras.losses.BinaryCrossentropy(from_logits=True),
        'department':keras.losses.CategoricalCrossentropy(from_logits=True)
    },
    loss_weights={"priority": 1.0, "department": 0.2},
)
# 임의의 데이터 만들기
title_data = np.random.randint(num_words, size=(1280, 10))
body_data = np.random.randint(num_words, size=(1280, 100))
tags_data = np.random.randint(2, size=(1280, num_tags)).astype("float32")

priority_targets = np.random.random(size=(1280, 1))
dept_targets = np.random.randint(2, size=(1280, num_departments))
history = multi_model.fit(
    {"title": title_data, "body": body_data, "tags": tags_data},
    {"priority": priority_targets, "department": dept_targets},
    epochs=2,
    batch_size=32,
    validation_split= 0.2
)
Epoch 1/2
32/32 [==============================] - 1s 30ms/step - loss: 1.2592 - priority_loss: 0.6883 - department_loss: 2.8543 - val_loss: 1.2638 - val_priority_loss: 0.7157 - val_department_loss: 2.7409
Epoch 2/2
32/32 [==============================] - 1s 31ms/step - loss: 1.2589 - priority_loss: 0.6885 - department_loss: 2.8520 - val_loss: 1.2629 - val_priority_loss: 0.7145 - val_department_loss: 2.7419
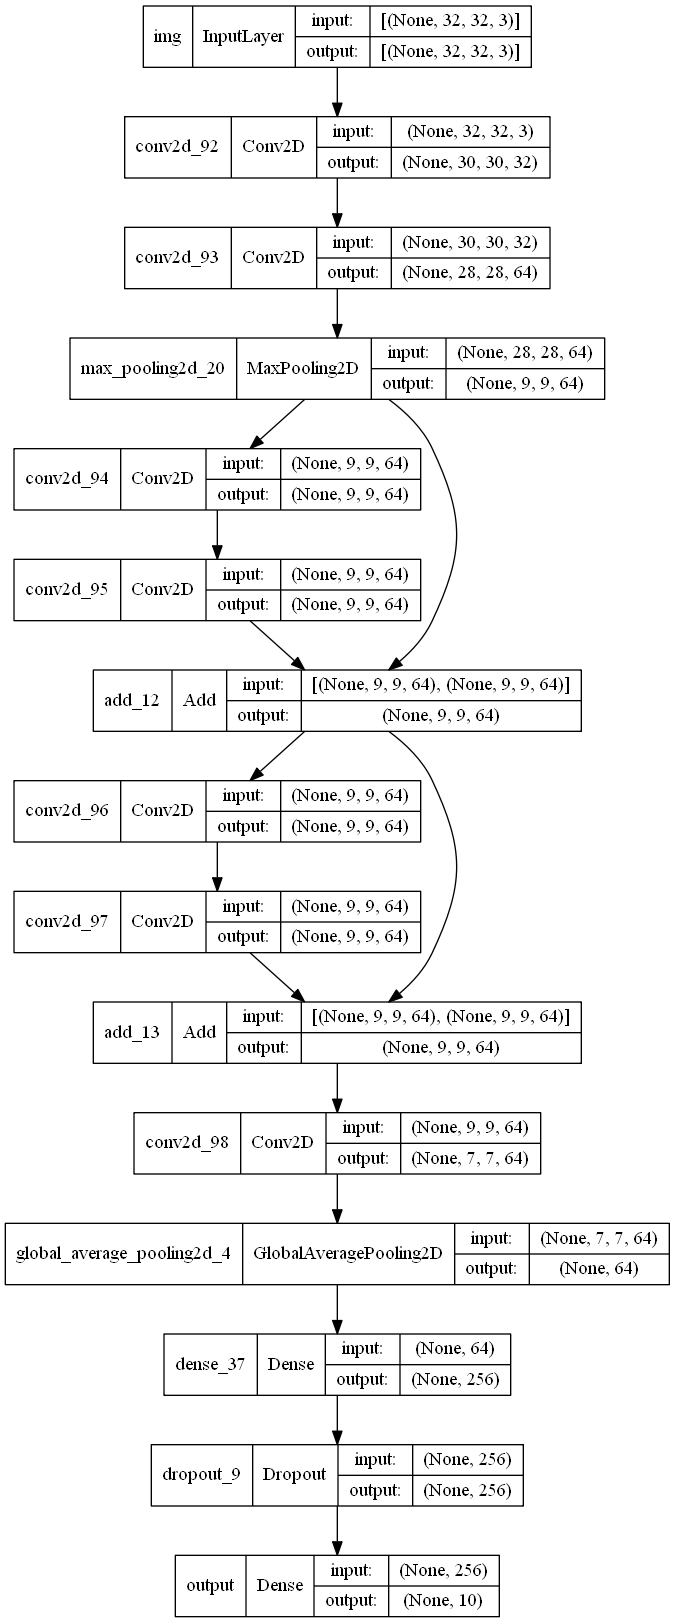
inputs = layers.Input(shape=(32,32,3),name="img")
x = layers.Conv2D(32,3,activation="relu")(inputs)
x = layers.Conv2D(64,3,activation="relu")(x)
block_1_output = layers.MaxPooling2D(3)(x)

x = layers.Conv2D(64,3,activation="relu",padding="same")(block_1_output)
x = layers.Conv2D(64,3,activation="relu",padding="same")(x)
block_2_output = layers.add([x,block_1_output])

x=layers.Conv2D(64,3,activation="relu",padding="same")(block_2_output)
x = layers.Conv2D(64,3,activation="relu",padding="same")(x)
block_3_output = layers.add([x,block_2_output])

x= layers.Conv2D(64,3,activation="relu")(block_3_output)
x = layers.GlobalAveragePooling2D()(x)
x = layers.Dense(256,activation="relu")(x)
x = layers.Dropout(0.2)(x)
output = layers.Dense(10,name="output")(x)

res_model= keras.Model(inputs,output,name="toy_resnet")
keras.utils.plot_model(res_model,show_shapes=True)
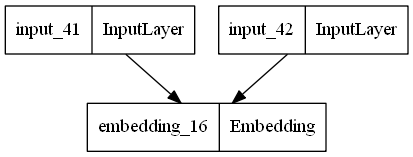
Shared Layers
# Embedding for 1000 unique words mapped to 128-dimensional vectors
shared_embedding = layers.Embedding(1000, 128)

# Variable-length sequence of integers
text_input_a = keras.Input(shape=(None,), dtype="int32")

# Variable-length sequence of integers
text_input_b = keras.Input(shape=(None,), dtype="int32")

# Reuse the same layer to encode both inputs
encoded_input_a = shared_embedding(text_input_a)
encoded_input_b = shared_embedding(text_input_b)
shared_model = keras.Model([text_input_a,text_input_b],[encoded_input_a,encoded_input_b])
keras.utils.plot_model(shared_model)
keras.Model()
Model Subclassing(모델 서브클래싱)
- init 메소드: 모델에서 사용할 변수(layer, weight, 하이퍼파라미터등)를 지정
- call 메소드: 모델 계산방식을 정의한다.
inputs = keras.layers.Input(shape=(28,28))
x = layers.Flatten()(inputs)
x = layers.Dense(128,activation="relu")(x)
x = layers.Dropout(0.2)(x)
outputs = layers.Dense(10,activation="softmax")(x)
subclass_model = keras.Model(inputs, outputs)
class SubClassModel(keras.Model):
    def __init__(self):
        super().__init__()
        self.flatten = keras.layers.Flatten(input_shape=(28,28))
        self.dense1 = keras.layers.Dense(128, activation="relu")
        self.drop = keras.layers.Dropout(0.2)
        self.dense2 = keras.layers.Dense(10, activation='softmax')

    def call(self,inputs,training=False):
        x = self.flatten(inputs)
        x = self.dense1(x)
        x = self.drop(x)
        return self.dense2(x)
subclass_model = SubClassModel()
subclass_model.compile(
    optimizer = optimizer,
    loss = loss,
    metrics=['accuracy']
)
subclass_model(x_train[:1])
<tf.Tensor: shape=(1, 10), dtype=float32, numpy=
array([[0.06699875, 0.09070145, 0.0425561 , 0.12139773, 0.15623553,
        0.07159549, 0.0760842 , 0.10689273, 0.09732477, 0.17021324]],
dtype=float32)>subclass_model.summary()
Model: "sub_class_model_6"
_________________________________________________________________
 Layer (type)                Output Shape              Param #
=================================================================
 flatten_9 (Flatten)         multiple                  0

 dense_17 (Dense)            multiple                  100480

 dropout_8 (Dropout)         multiple                  0

 dense_18 (Dense)            multiple                  1290

=================================================================
Total params: 101,770
Trainable params: 101,770
Non-trainable params: 0
_________________________________________________________________
subclass_model = SubClassModel()
outputs = subclass_model(inputs)
model = keras.Model(inputs, outputs)
model.summary()
Model: "model_4"
_________________________________________________________________
 Layer (type)                Output Shape              Param #
=================================================================
 input_3 (InputLayer)        [(None, 28, 28)]          0

 sub_class_model_5 (SubClass  (None, 10)               101770
 Model)

=================================================================
Total params: 101,770
Trainable params: 101,770
Non-trainable params: 0
_________________________________________________________________
'딥러닝' 카테고리의 다른 글
| GAN개념과 DCGAN 구현 (0) | 2022.07.12 |
|---|---|
| stanford dogs 분석 및 학습하기 (1) | 2022.06.23 |
| 클래스 활성화의 히트맵 시각화 (0) | 2022.06.23 |
| 컨브넷 필터 시각화 (0) | 2022.06.23 |
| Cat vs Dog 분류 모델 만들기 (0) | 2022.06.18 |


